用Vosk实现实时语音识别
阅读 6.5k
实时语音识别是将音频流实时识别成文字,在视频直播、会议和课堂等场景都能派上用场。本文介绍如何使用开源库Vosk来在边缘设备上实现实时语音识别。
为什么是Vosk
Vosk库是一个开源的语音识别库,它基于Kaldi语音识别框架,并专为在边缘设备上运行而设计。与大型云服务提供商(阿里云、腾讯云等)的语音识别服务相比,其准确率会差不少。但是,它是开源的,可以免费使用,这对于预算有限的项目来说还是不错的。同时,Vosk可以在隐私敏感或网络不可靠的环境中部署。很适合性能受限的边缘设备上使用。它既支持录音文件识别,也支持实时语音识别。
技术实现
Vosk提供了多种语言的API,包括Python、Java、C++等,可以方便地集成到各种应用程序中。因为Python具有灵活、简单的特点,很适合中小型项目的业务场景,这里就以Python语言来实现该功能。同时,为了便于实时查看,还需要将识别出来的文本实时推送到网页上进行展示。
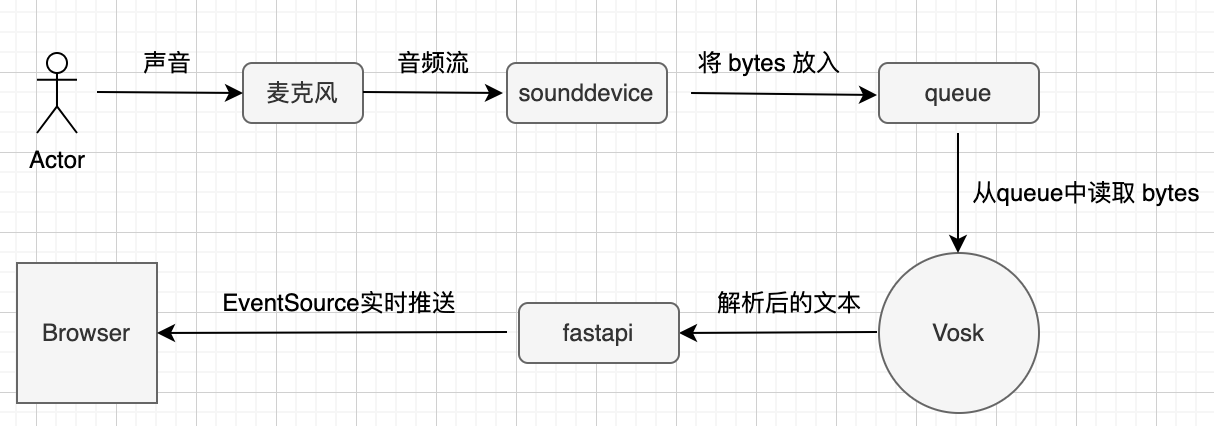
我们来看下需求的流程图,如下所示:

首先,sounddevice模块将麦克风中的音频流处理为 bytes 放入到队列中,Vosk 从队列中读取 bytes 进行识别,得到解析后的文本。最后,解析后的文本使用 fastapi 和 EventSource 实时推送到浏览器中进行展示。核心代码如下:
import asyncio
import json
import queue

import sounddevice as sd
import vosk
from fastapi import FastAPI
from fastapi.middleware.cors import CORSMiddleware
from fastapi.responses import StreamingResponse

app = FastAPI()

# 配置 CORS
origins = [
    "http://0.0.0.0:5500",
    "http://localhost:5500",
    "https://your-other-domain.com",
    "*",  # 允许所有域名,慎用
]

app.add_middleware(
    CORSMiddleware,
    allow_origins=origins,
    allow_credentials=True,
    allow_methods=["*"],
    allow_headers=["*"],
)

# Vosk 模型和音频队列
q = queue.Queue()
model_path = "models/vosk-model-cn-0.22"
device_index = 0  # 替换为你实际的设备索引
model = vosk.Model(model_path)


# SSE 生成器
async def event_generator():
    recognizer = vosk.KaldiRecognizer(model, 44100)

    while True:
        try:
            data = q.get()
            if recognizer.AcceptWaveform(data):
                result = recognizer.Result()
            else:
                result = recognizer.PartialResult()

            json_str = json.dumps(
                json.loads(result), separators=(",", ":"), ensure_ascii=False
            )
            yield f"data: {json_str}\n\n"
            await asyncio.sleep(0.1)  # 控制发送频率
        except Exception as e:
            yield f"data: error: {str(e)}\n\n"


# SSE 路由
@app.get("/stream")
async def stream():
    return StreamingResponse(event_generator(), media_type="text/event-stream")


# 音频录制回调
def callback(indata, frames, time, status):
    if status:
        print(status)
    q.put(bytes(indata))


# 启动音频流
async def start_audio_stream():
    with sd.RawInputStream(
        samplerate=44100,
        blocksize=16000,
        device=device_index,
        dtype="int16",
        channels=1,
        callback=callback,
    ):
        print("Audio stream started")
        while True:
            await asyncio.sleep(1)


# 在 FastAPI 应用启动时启动音频流
@app.on_event("startup")
async def startup_event():
    asyncio.create_task(start_audio_stream())
将上面代码复制到 realtime.py 文件中,然后用如下命令来启动:
uvicorn realtime:app --host 0.0.0.0 --port 9000 --reload成功后,在本地9000端口便启动了 fastapi 服务。如果前端需要实时展示,可以创建一个 index.html 文件,核心的JavaScript代码如下:
let eventSource = ''

new Vue({
  el: '#app',

  data: {
    rows: []
  },

  methods: {
    startRecognize: function () {
      eventSource = new EventSource('http://0.0.0.0:9000/stream')

      eventSource.onmessage = event => {
        let currRowIndex = this.rows.length - 1

        const data = event.data
        const { partial, text } = JSON.parse(data)
        console.log(currRowIndex, data, partial, text)

        // partial 有数据,更新当前行的row内容
        if (partial !== undefined) {
          this.rows[currRowIndex] = partial
        }

        // text 出现,该句结束
        if (text !== undefined) {
          console.warn('new line...')

          if (text !== '') {
            this.rows[currRowIndex] = text
            this.rows = [...this.rows, ''] // 在原有行的基础上,增加一行,值为 ""
          }
        }
      }

      eventSource.onerror = function () {
        console.error('SSE 连接出错')
        eventSource.close()
      }
    }
  },

  mounted() {
    this.rows = ['']
    this.startRecognize()
  }
})
这里使用Vue2,前端页面通过URL地址 http://0.0.0.0:9000/stream 来订阅 eventsource 服务。
注意事项
在实现的过程中,有几个坑要注意:
- evensource返回的格式。eventsource必须要以
data:开头,以\n\n结尾,中间不能出现单个的\n。 - 传递给sounddevice的设备id要正确,可以通过
sd.query_devices()来获得正确的麦克风id。
最后编辑于: 2024-12-22